
In the future, all media management will be available in Finfo One and will therefore be handled in the same place where you find your article information. This is currently under development, and until then we refer you to our media interface: Contribute.
The Contribute user manual can be found here.
Finfo Media
The need for market and sales-related information is increasing significantly in the building materials trade as more and more customers choose to shop online. The pressure on suppliers becomes high when all their customers demand the same information but in different formats.
With Finfo Media, you turn complex product information delivery into a seamless, standardized process. One source, one format, for every customer.
Finfo Media acts as a hub between the supplier and the retailers regarding product-related images, texts and other attachments. The service creates a quality-assured flow that benefits both parties. By using Finfo Media, you can direct all customers to one place where they, in turn, can retrieve the information in the same way from multiple suppliers.
The service customizes the format and layout according to the recipient's requirements. The service handles the flow of product images, product documents, and product texts in a unified and standardized manner between the supplier and the trade.
Resource types
There are many different types of resources, for example images and documents. Below are the resource types you can work with in Finfo Media.
Product Images
Providing high-quality product images is essential for successfully marketing your products in the digital world. An image can enhance the understanding of the product, strengthen your brand, and lead to increased sales.
You are able to upload nine images per type, but Finfo recommends always including at least one high-quality Product Image, Single. This image is fundamental to how your products are perceived and can influence the customer's decision-making process. Complementing this with other types of images can enrich the product presentation and offer a more comprehensive visual experience for the customer. By carefully selecting images that represent your products, you contribute to a stronger presence in the digital commerce environment and improve the customer experience.
|
Type |
Description |
|---|---|
|
Product Image, Single |
Product isolated. Only one product per image.
|
|
Product Image, Group |
Isolated products. Multiple of the same or similar product.
|
|
Contextual Image |
Product with background. For example, in a usage context.
|
|
Action Image |
Image showing the product in use.
|
|
Line Drawing |
Line drawing of the product.
|
|
Brand, Logo |
The product's logo.
|
|
Color |
Image showing the color.
|
|
Product Surface |
Shows the product's surface.
|
Recommended Specifications
Finfo has an automatic control for incoming images and classifies them accordingly. Images are sent to retailers without any changes or processing, so you should provide the highest quality images possible.
Requirements for web
The images must at least meet the requirements for display in digital channels (web). The requirement applies to all Product images, Action- and Contextual images, Line drawing, Logo, Color, Product surface images, as well as energy labels.
-
The longest side must be at least 1200 pixels
-
Images cannot be larger than 60 MB
-
Accepted file types are JPG, TIFF, PNG, GIF and WebP
Requirements for print
For print quality the images must meet the following requirements:
-
The longest side must be at least 3508 pixels
-
Images cannot be larger than 60 MB
-
The file type must be JPG, TIFF, PNG, GIF or WebP
-
Images must have a transparent background.
Product Documents
As a supplier, you have the option to submit twelve different types of documents. For certain types, you can upload up to nine per article, while others allow only one (see Table below). All documents must be in PDF format.
Documents can be displayed under two headings in the interface: Documents and Legacy documents. This applies to document types that are only allowed to have one active document, for example an Environmental Product Declaration (EPD). The older document that is replaced will be moved to Legacy documents to ensure traceability for retailers who may need to access previous documentation.
|
Type |
Description |
Quantity |
|---|---|---|
|
Product Data sheet |
A product data sheet contains detailed information about the product, such as specifications, technical data, and product characteristics. |
1-9 |
|
Safety Data sheet |
Describes safety and handling of the product, including information on risks and any protective measures, according to applicable laws and regulations. This is particularly important for businesses handling chemicals or other potentially hazardous materials. |
1-2 |
|
Construction Declaration (BVD) |
Information on the product's environmental performance according to current regulations. Environmental labeling Type II. |
1 |
|
Environmental Product Declaration (EPD) |
Environmental Product Declaration, Type III labeling. Information on the product's environmental performance and its impact throughout its lifecycle. A critical document for customers focusing on sustainability, as an EPD can serve as a basis for evaluating the product's environmental impact in a project. |
1 |
|
User Manual |
A manual that provides detailed instructions on how to use the product correctly and efficiently. It often includes guidance, troubleshooting tips, and other instructions. |
1-9 |
|
Installation Instructions |
Step-by-step instructions for assembling or installing the product. This document facilitates the assembly process and minimizes the risk of incorrect installation. |
1-9 |
|
Disassembly Instructions |
The document describes how the product should be dismantled and reused, inspected for damage, and protected during transport and storage. It also includes guidelines for renovation and renewal, as well as information on available spare parts. |
1-9 |
|
Exploded View |
An illustration showing the product in cross-section and clearly identifying all components. This document demonstrates the product's construction, making maintenance and repairs easier. |
1-9 |
|
Performance Declaration |
Declarations specifying the product's performance characteristics and certifying compliance with applicable regulations through documents like Certificate of Conformity (CoC), Declaration of Conformity (DoC), and Declaration of Performance (DoP). |
1 |
|
Product Catalog |
Catalogs compile extensive information about a product range or assortment. They are often used as a marketing tool and help customers gain an overview of available products. |
1-9 |
|
Certificate |
Certifications indicating the product's compliance with specific standards and regulations. |
1-9 |
|
Operation & Maintenance |
Data sheet focusing on the maintenance of the product to ensure a long lifespan and optimal performance. |
1-9 |
Energy Label Files
|
Type |
Description |
Format |
Quantity |
|---|---|---|---|
|
Energy Label (pdf) |
Label for products showing their energy efficiency class, from A-G, to help consumers assess energy consumption. |
|
1 |
|
Energy Label (image format) |
Label for products showing their energy efficiency class, from A-G, to help consumers assess energy consumption. |
JPG, TIFF, PNG, GIF, WebP |
1 |
|
Product Sheet Energy Label / EPREL Documentation |
Product declaration designed according to regulations. Environmental labeling Type II |
|
1 |
Construction Files
|
Type |
Description |
Format |
Quantity |
|---|---|---|---|
|
CAD File |
Digital file supporting CAD software for drawing and modelling objects. |
Stp, dwg |
1-2 |
Product Texts
Product texts and descriptions play a crucial role in communicating the value of a product to potential customers. Correctly and strategically crafted texts not only improve the customer's understanding of the product but also increase their willingness to make a purchase. As a supplier, you can submit four different types of texts, each serving a unique purpose. Together, they form a comprehensive product description that promotes sales and enhances the customer experience.
|
Type |
Description |
Max. characters |
|---|---|---|
|
Web Name |
A name tailored for use on websites and e-commerce platforms. |
100 |
|
Product Text, Intro |
A brief and concise text providing an initial insight into what the product offers. It should be both informative and persuasive, working well alongside a product image. |
250 |
|
Product Text, Complete |
A more detailed description that complements the summary. It should provide full information of the product and stand alone, meaning it can be read and understood without the summary. |
4000 |
|
Bullet List |
An informative list highlighting the key attributes and features that make the product unique (USP: Unique selling points). |
1000 |
Some words are not allowed in product texts for legal reasons and will be blocked upon import.
Forest Stewardship Council, FSC, and PEFC are registered trademarks. To use these, the recipient of the product texts must have chain-of-custody certification or a trademark license for the specific product. Since many recipients lack this, they risk sanctions from FSC/PEFC if these words appear in marketing material (e-commerce is considered marketing in legal terms). Read more about this here.
Spare Parts and Accessories
It is possible to link entities to display a product together with its accessories and spare parts. By creating this connection, customers can easily see which accessories and spare parts are available for a product without having to identify them manually. Linking spare parts and accessories can lead to increased sales at the time of purchase, as well as for future needs.
Connect your product with accessories and spare parts to maximize your product information, boost sales, and increase customer satisfaction.
Example
A screwdriver (Product A) has two products that can be used together with it. By linking them, you can display bits (Product B) and a battery (Product C) to visualize and simplify the search for related products.
|
Type |
Description |
Quantity |
|---|---|---|
|
Accessories |
Link entities to expose a product together with accessories. |
10 |
|
Spare Parts |
Link entities to expose a product together with spare parts. |
10 |
Model number/name
Creates a parent-child relationship between the product and the item.
|
Type |
Description |
Quantity |
|---|---|---|
|
Model number |
Links multiple items that are part of the same product. |
1 |
External links
YouTube links to your installation- or marketing videos.
|
Type |
Description |
Quantity |
|---|---|---|
|
External links |
Installation-, product- and marketing videos. |
1-2 |
Quick guide for Contribute
Log in
Go to the Contribute login page and enter your username and password. If you have access to multiple organizations, select the account you want to log in to from the list.
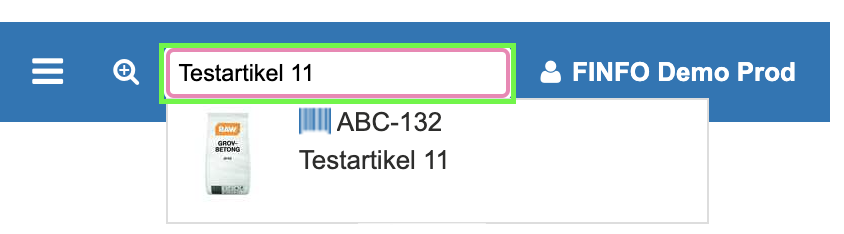
Search function
To quickly find an item or resource, you can use the quick search at the top right of the page. You can enter, for example, an item number, description, or file name.
If you want to perform a more advanced search or select a larger set of results, click the magnifying glass to open the Query Editor. Read more about how to use this function in the Query Editor section below.
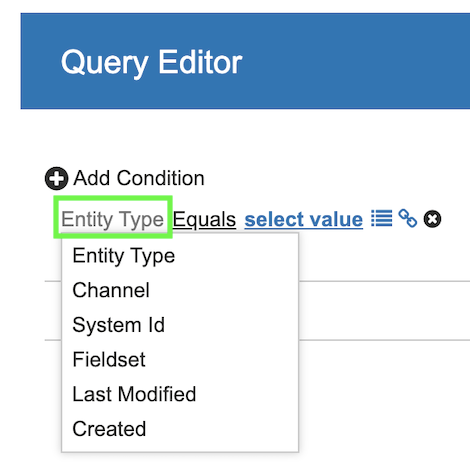
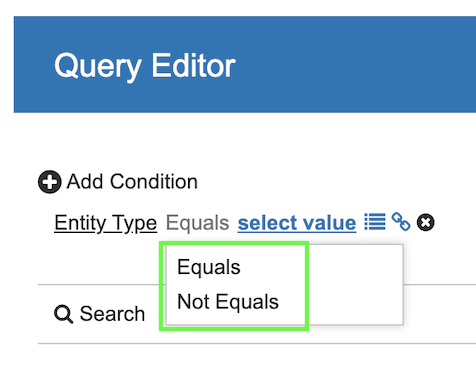
Query Editor
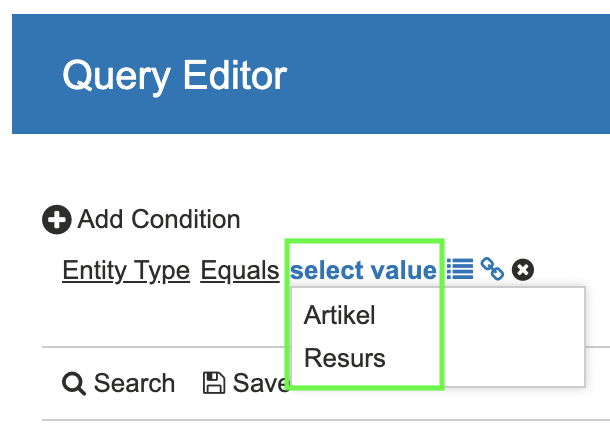
Almost all fields can be searched via the Query Editor. You can find it to the left of the search box at the top of the page.

In the editor, all underlined text is editable, and for blue highlighted text (select value) a selection must be made before the search is executed.
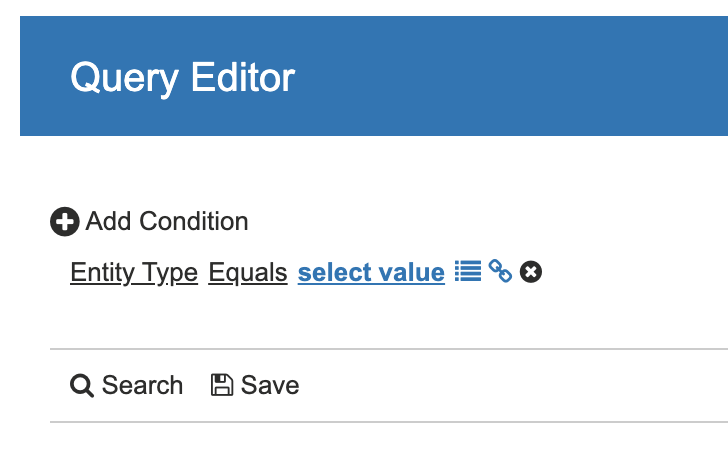
The first editable field is the base condition. You can have multiple base conditions (+Add condition), but only one of each type. The Entity Type condition allows you to search for items or resources. A resource can be, for example, images or documents. Other useful base conditions are Last Modified and Created. These are especially helpful when you want to find new items or resources.
The next selection is the operator. In some cases, it consists of Equals or Not Equals, but often there are several options, such as Contains, Is Empty, or Begins with.
The final selection is the detail condition. Here you can choose from a list, enter free text, or select a date, depending on which criteria you are working with.
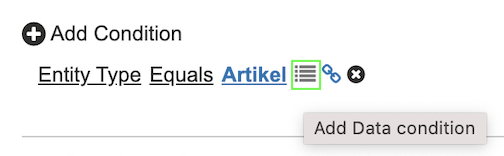
To the right of the detail condition, there are two additional elements. The first one, Add Data condition, adds a data field from the entity you are searching for. If you have selected the Item entity, the data fields are all fields from the Details tab on the item card. You can, for example, search for items where “the description contains glue” or “the product text introduction is empty.” There is no maximum limit to the number of data fields in your search, but you can only have one of each type.
The next element allows you to search related entities. A relationship between two entities can, for example, be:
Resource <–> Item
-
Main Image: There can only be one Main Image per item. This is the image that you, as a supplier, recommend using as the primary image. Finfo automatically retrieves the first “Product image, Single” image and sets it as the Main Image.
-
Image: All images that are not the Main Image are added as Image.
-
Document: All documents are linked using a Document relationship.
Item <–> Item
-
Spare Parts: Linked spare parts for your products.
-
Accessories: Linked accessories for your products.
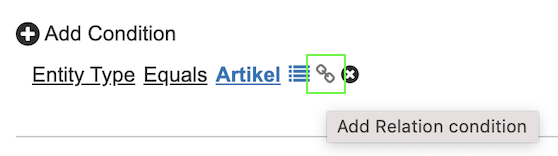
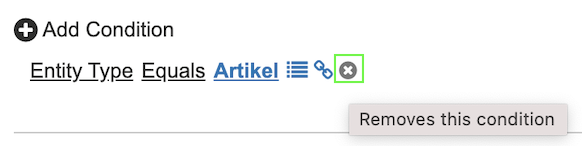
You can also undo a selection by clicking the x on the right.
Search or Save
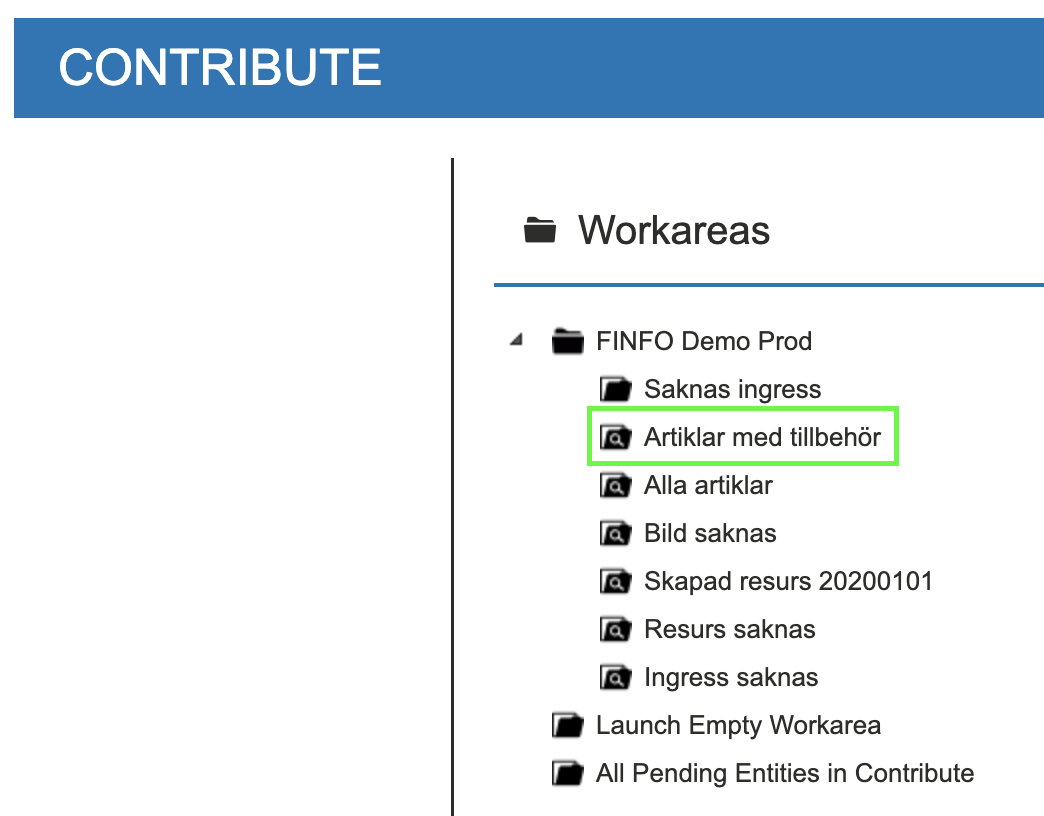
When you have completed your query (search), you can choose to run the search immediately to display the results. If it is a query you use frequently, we recommend saving it to your Work area. That way, you won’t need to build the query again, it will be available on the start page.

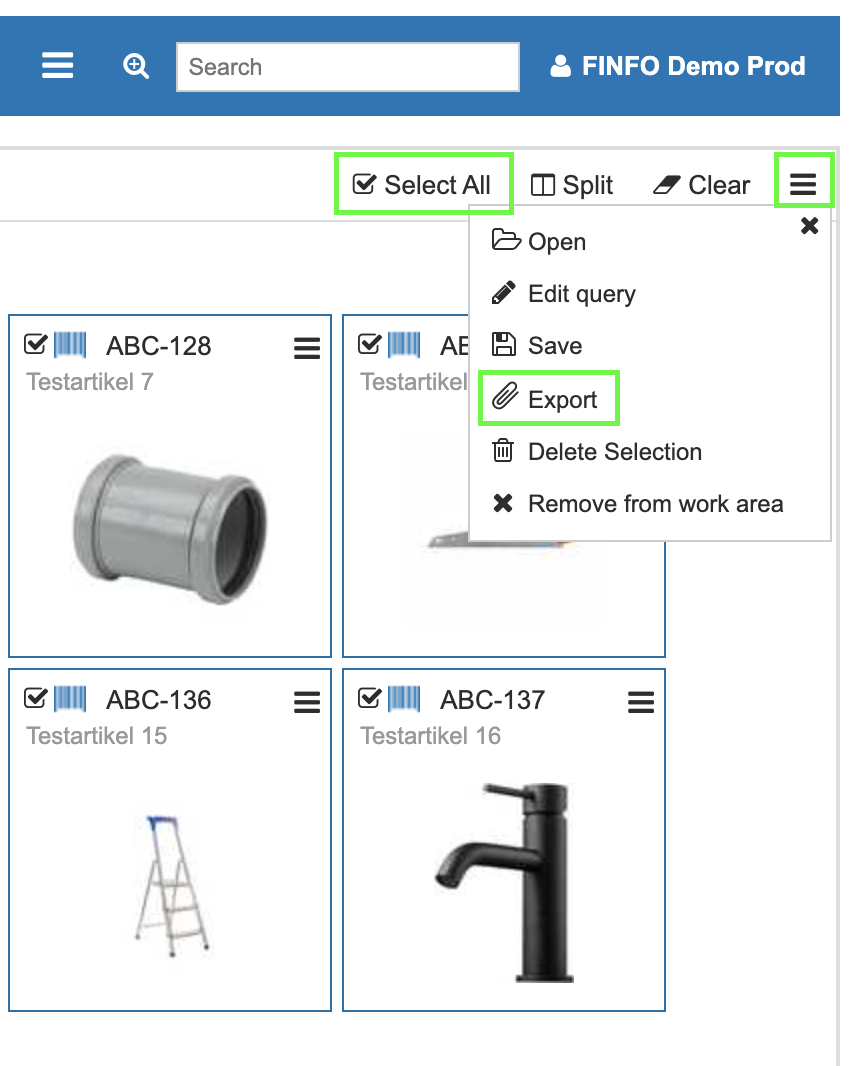
Export selection to Excel
Once you have made a selection, you can export the data to Excel to get an overview. Select all by checking Select all, or select the items/resources you want to include in the export. Then click the menu on the right and choose Export.
You will now see several options for which fields you want to export.
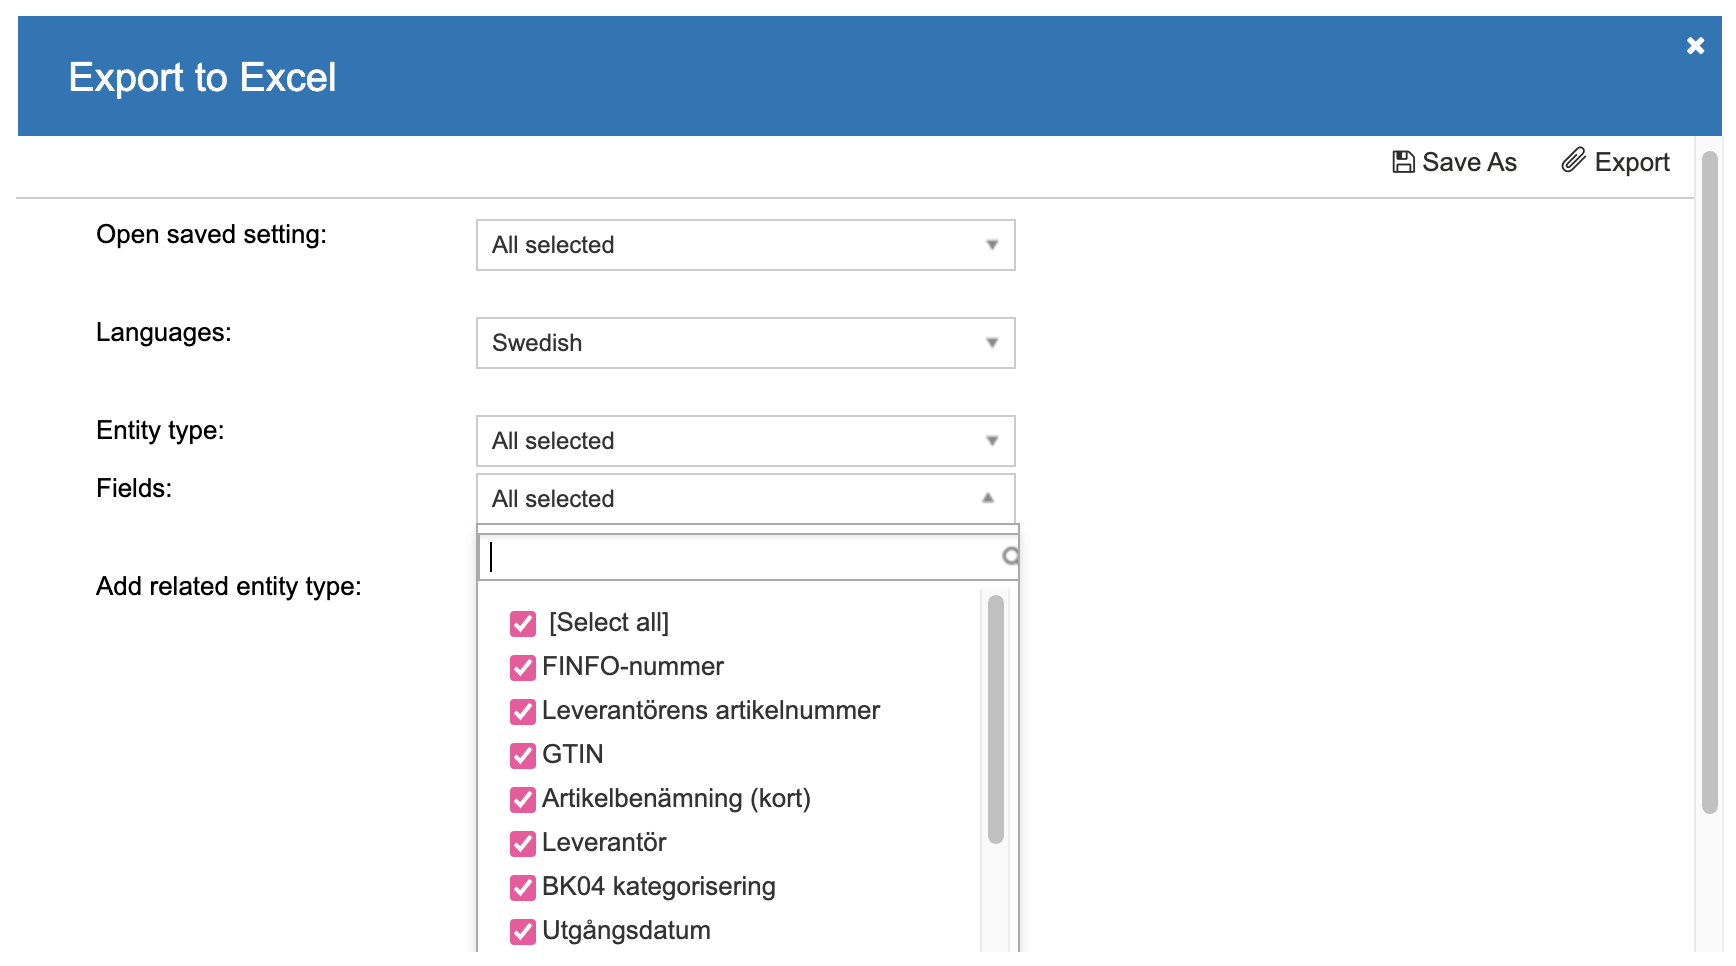
You can also add which relationships and fields you want to include.
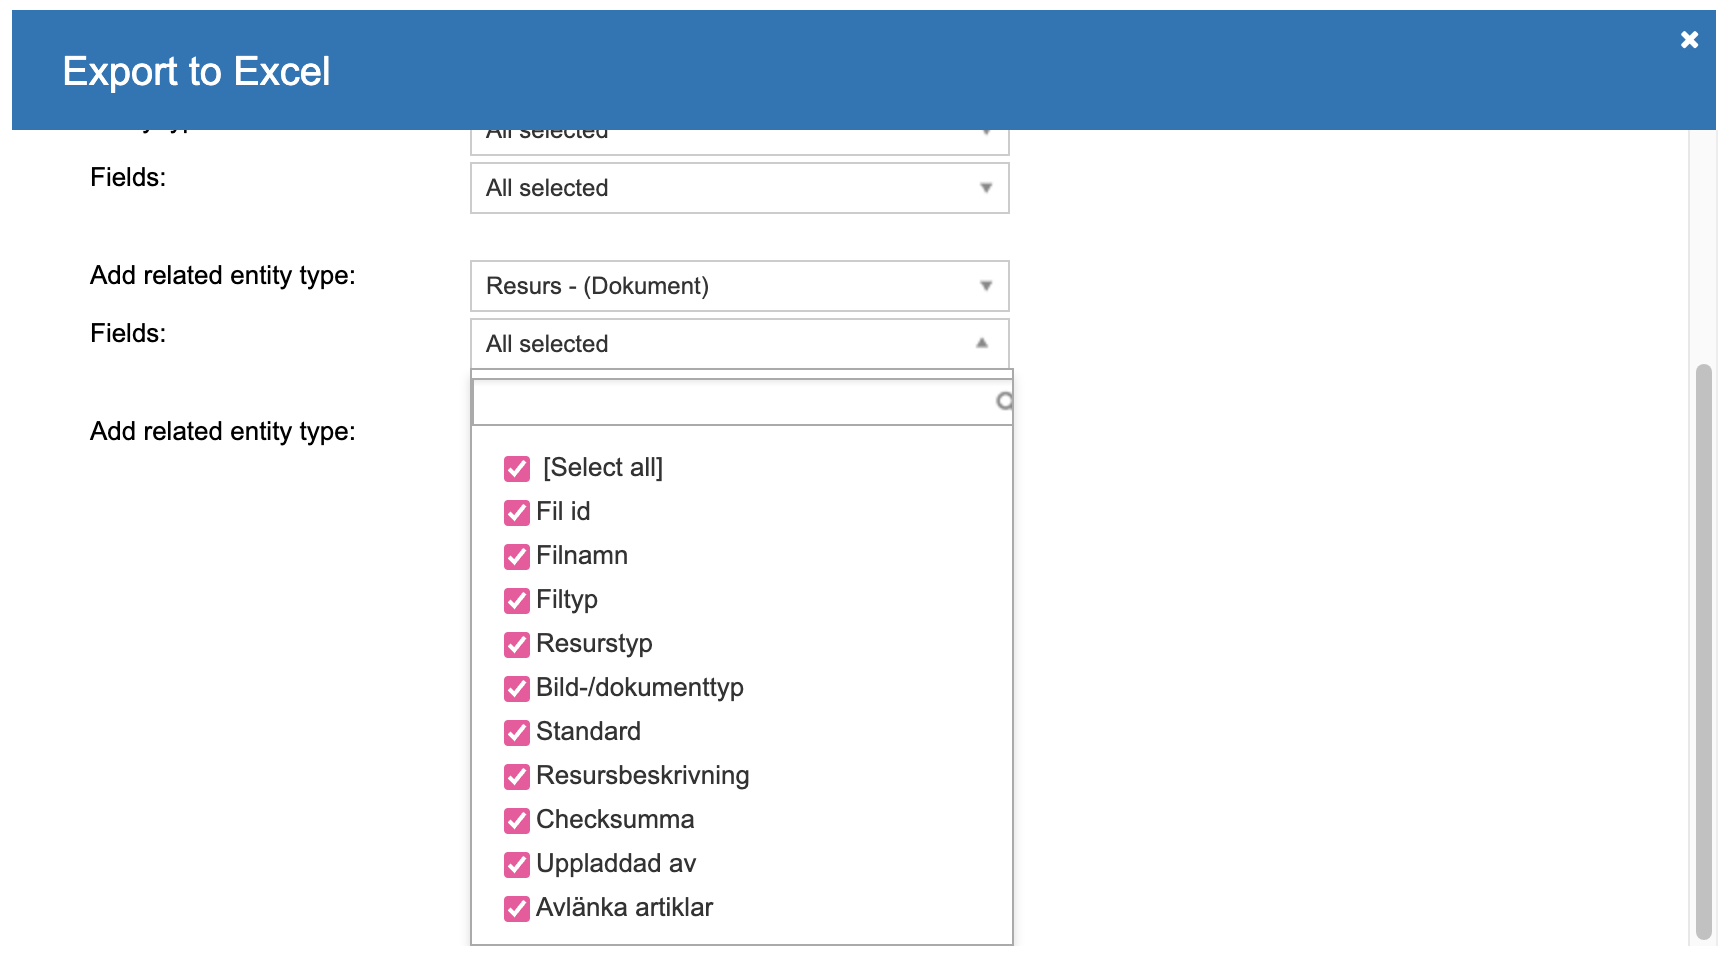
When you are satisfied with your selection, click Export to download your Excel file.
Examples of queries
By learning how to build queries, you will be able to work more efficiently and simplify the overview of your product information. Below are some tips on queries to use.
All items missing Product Text Introduction
Use this query to find items that are missing certain product texts, in this example the ingress.
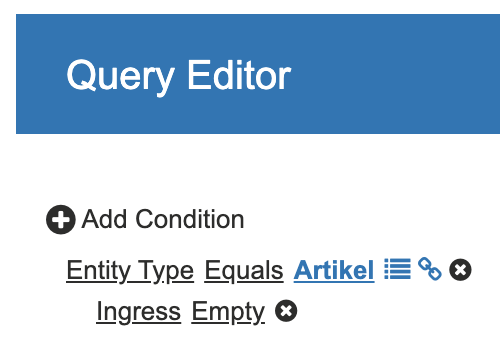
A tip is to save this search to your work area to create a convenient to-do list.
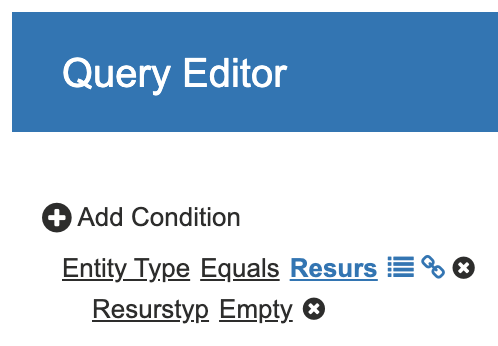
Resources without Content Type
This query helps you find resources (images and documents) that have not been tagged with what they are. If this field is empty, it will not be sent to recipients.
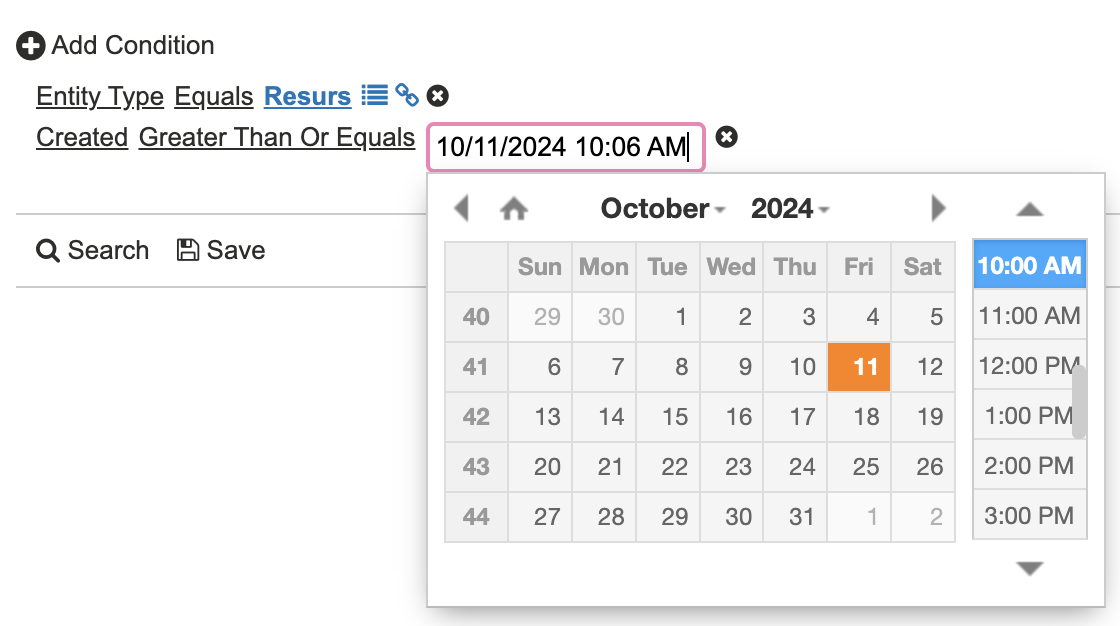
Resources created since
A simple query, for example, to find the most recently uploaded resources.
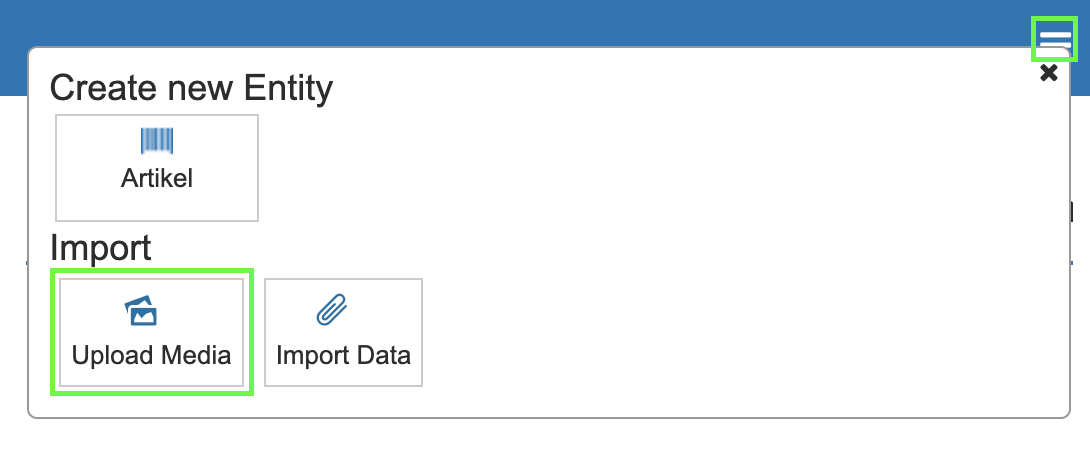
Upload media
Media (for example images and documents) is uploaded via the Upload Media menu. Click the menu option to the right of the Query Editor and select Upload Media.
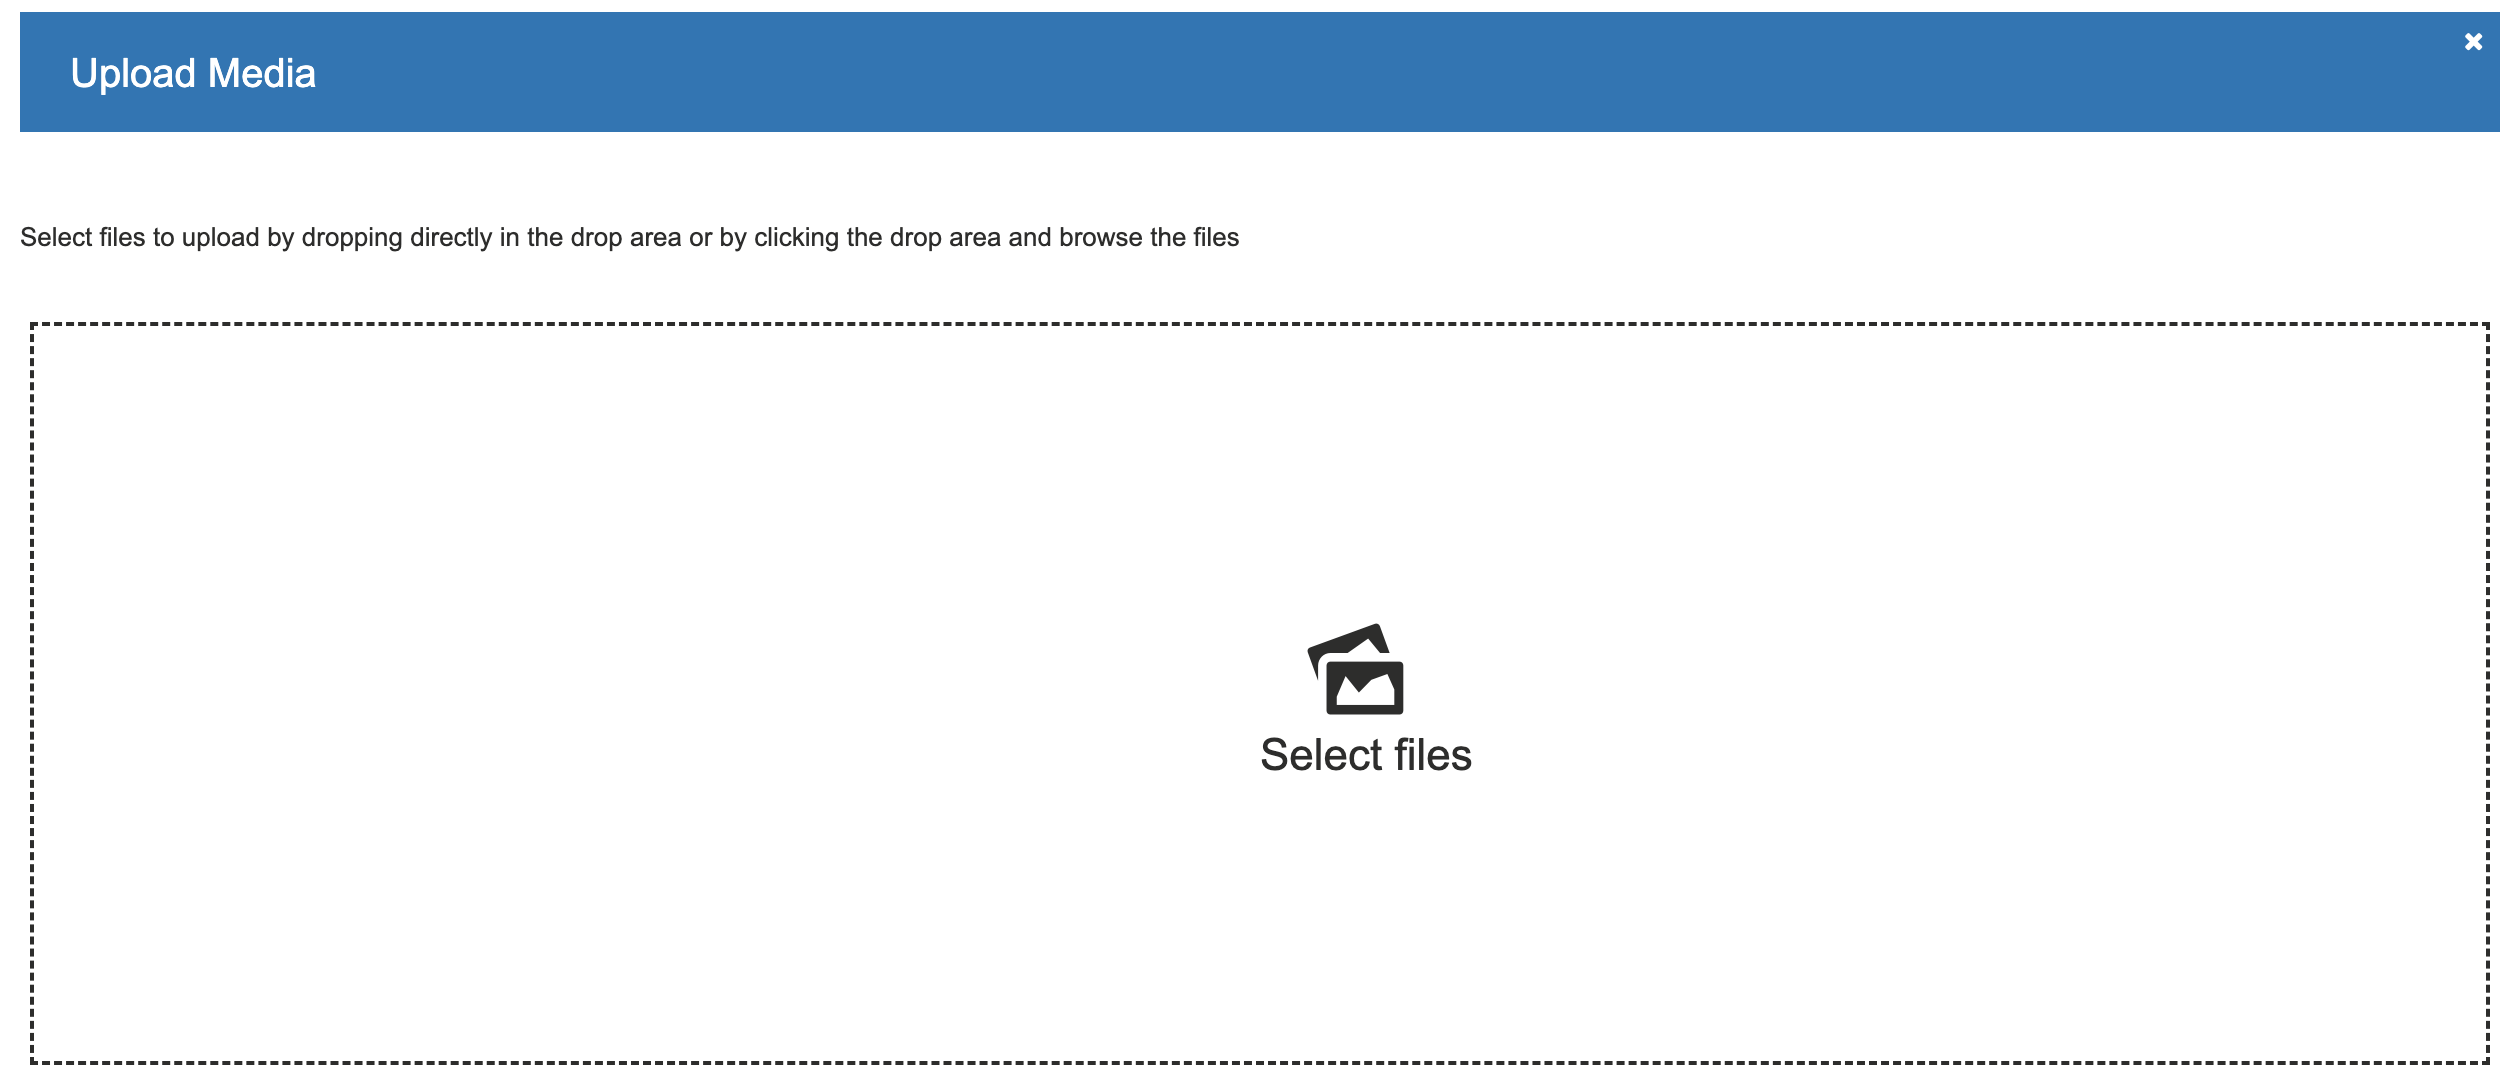
Select which files you want to upload by clicking Select files, or simply drag the files directly into the upload box.
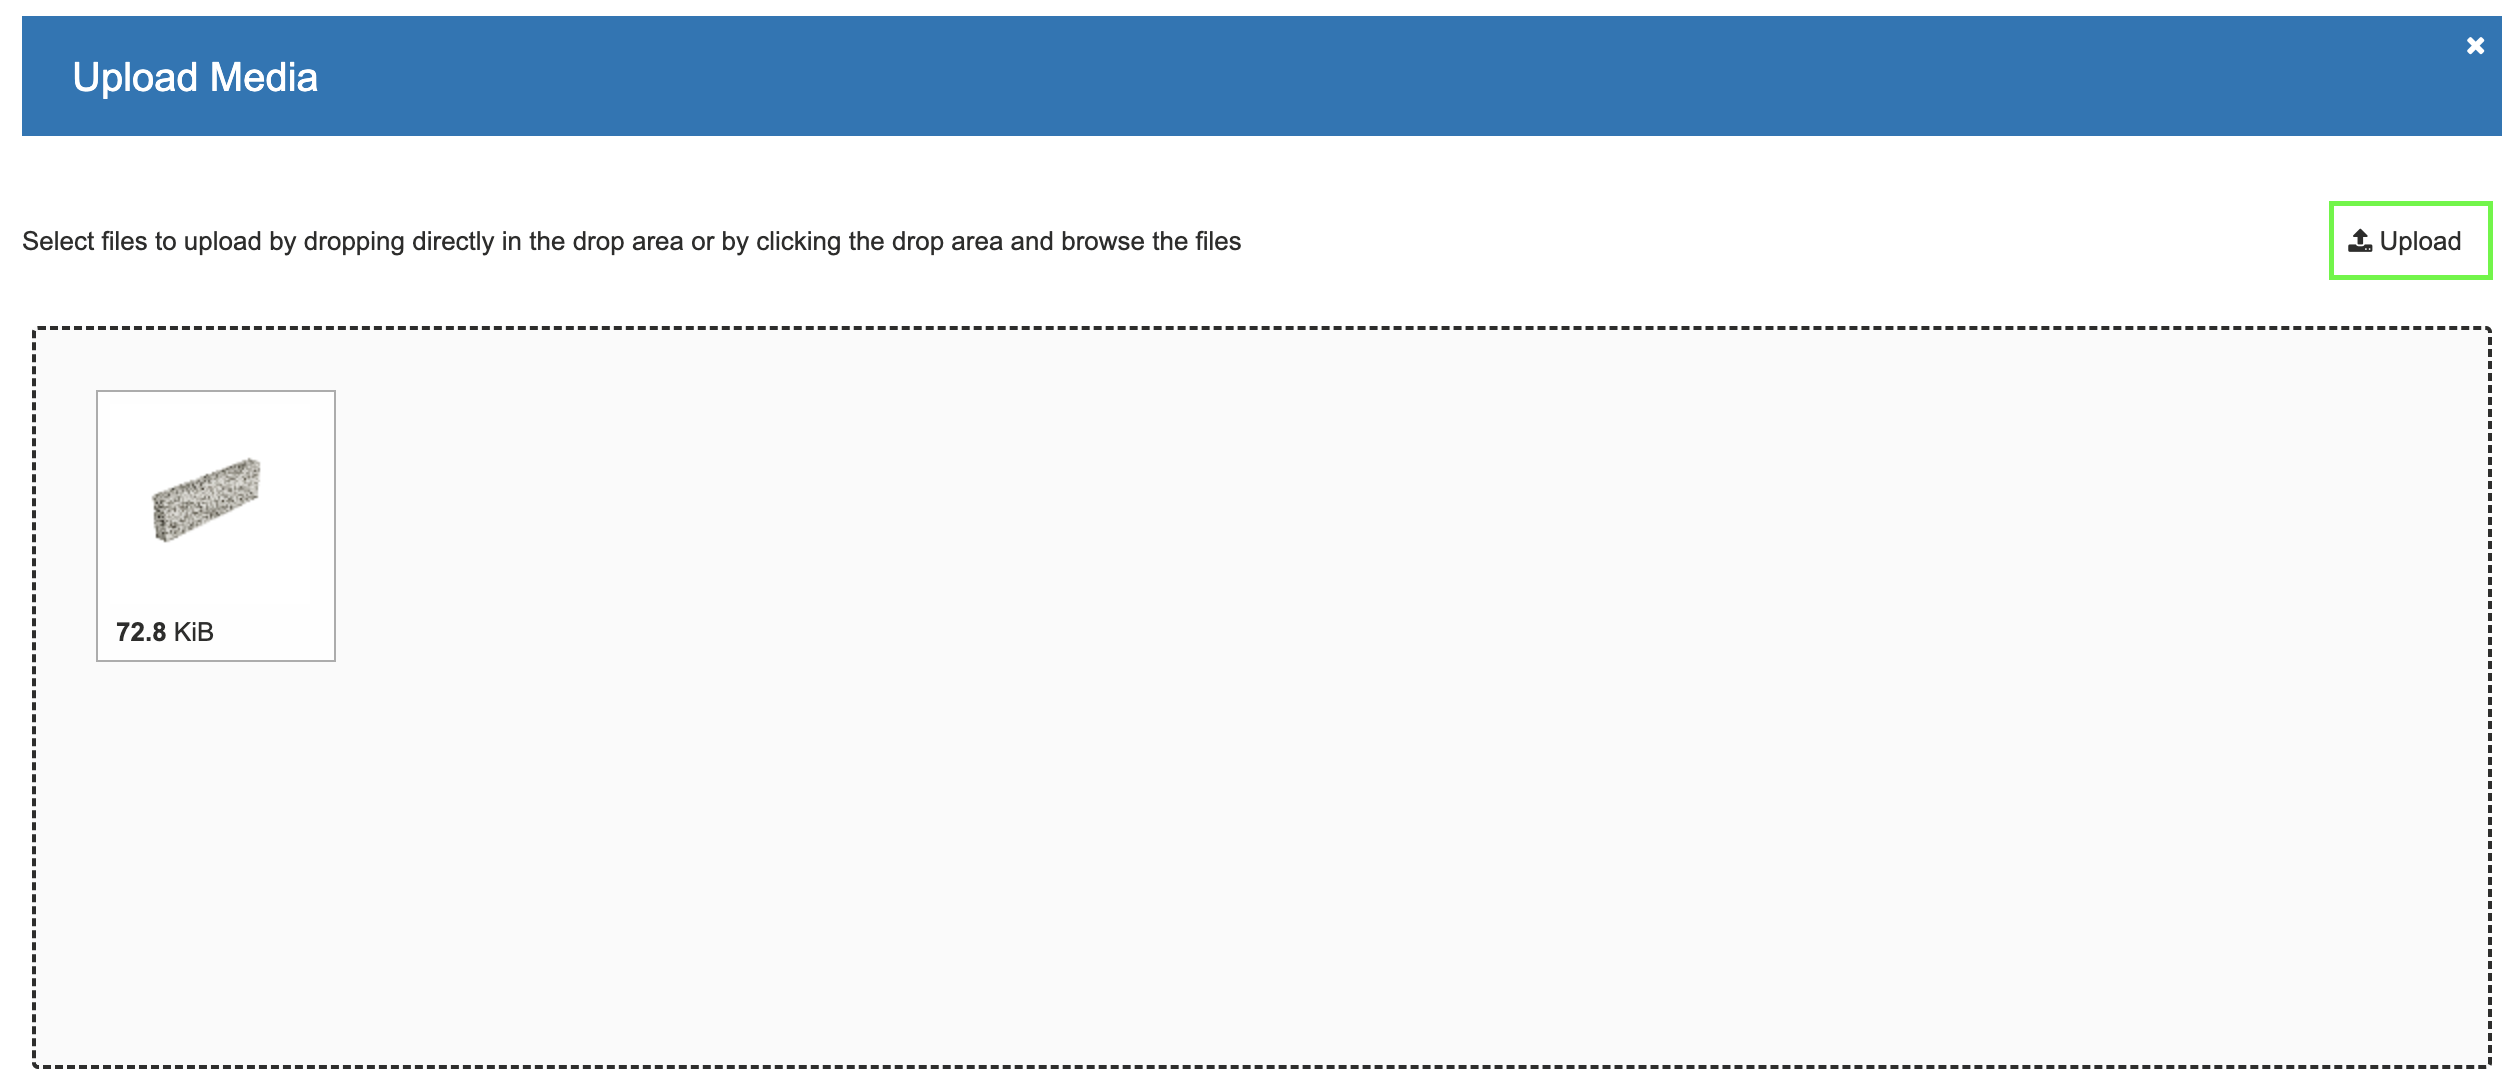
After selecting your files, click Upload and the resource will be uploaded.
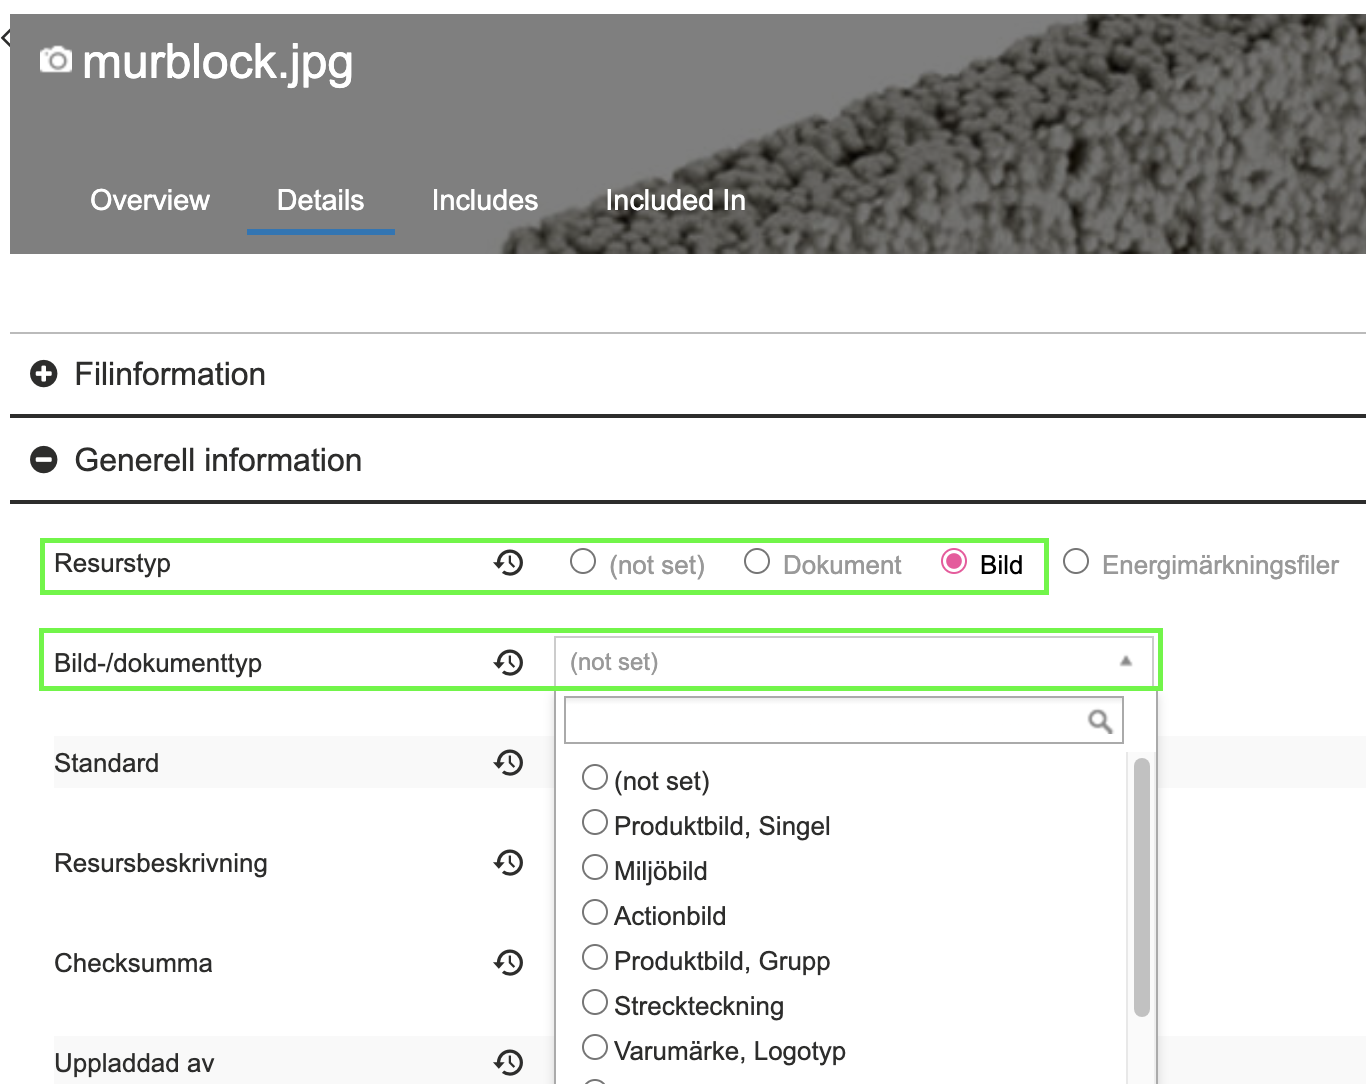
After uploading, you must assign the correct type to the resource. For example, an image will always have the Resource Type Image, but it initially lacks an Image Type. Find the resource, go to the Details tab and General information. Change to the correct type and save.
You can also upload a resource directly to an item. Open the item under the Media section and select Upload Media.

Link a resource to an item
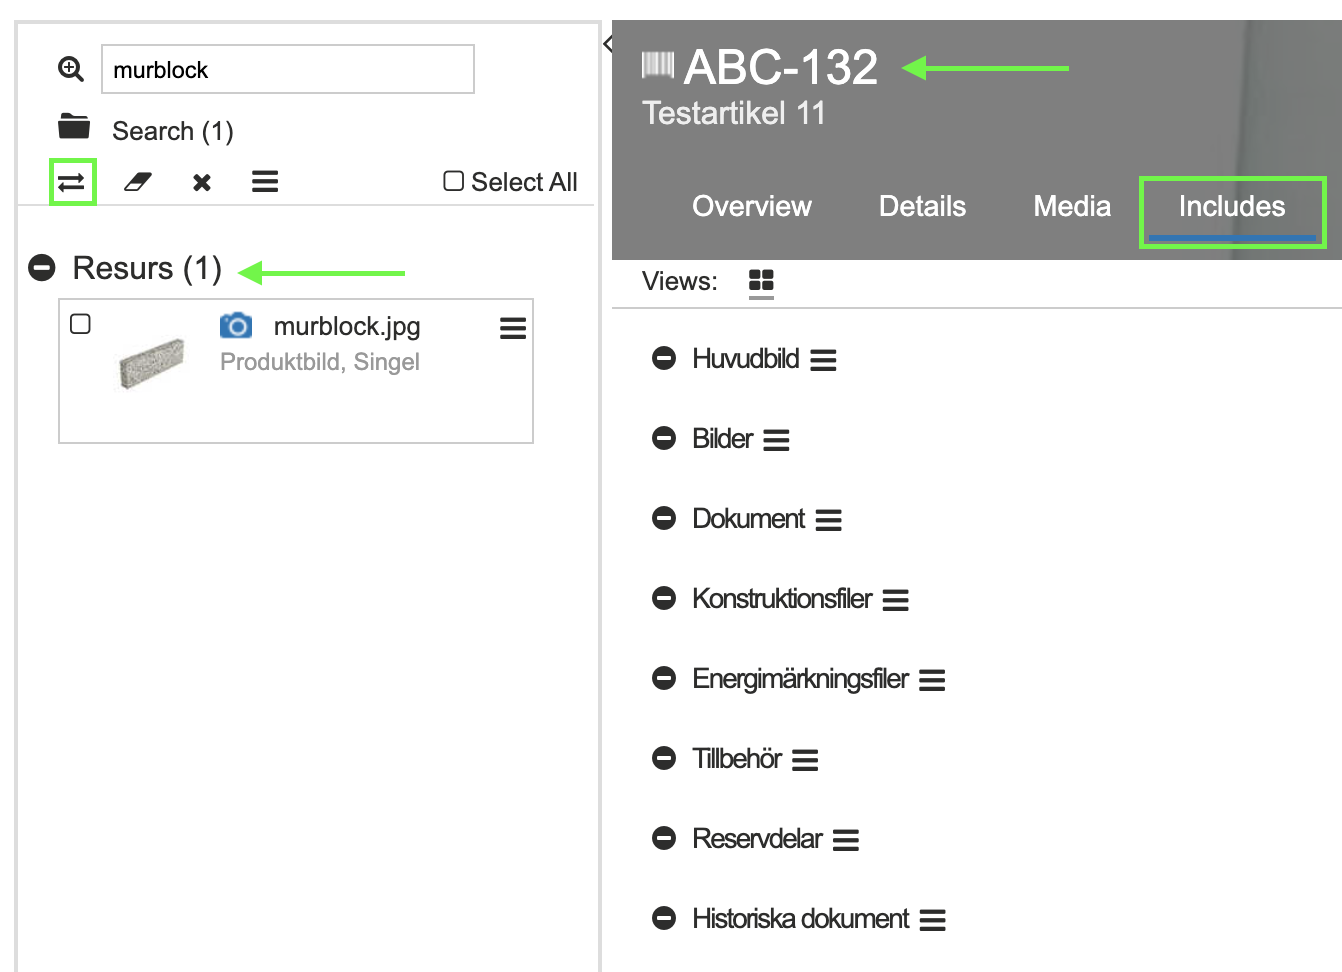
To link a resource to an item, drag and drop the selected resource to the correct item using the steps below. Search for the resource you want to link to the item. Click the Split icon to create two work areas.
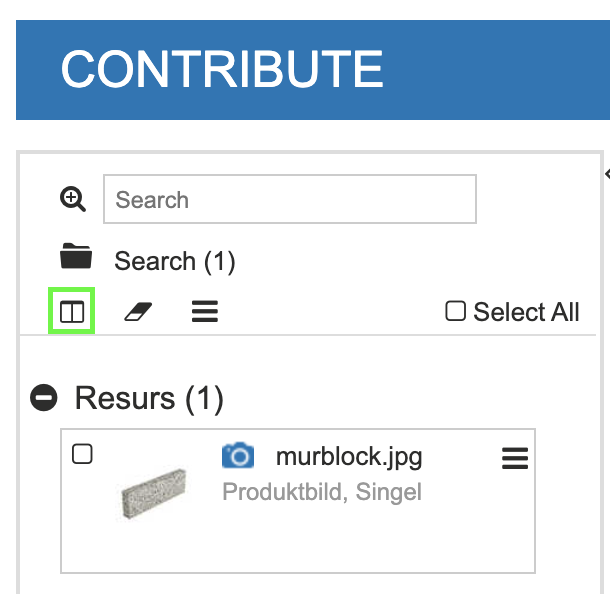
Then search for and click on the item that should have the resource. Open the Includes tab to enable linking. The resource is now on the left and the item on the right. If the resource is not visible, click the double-arrow icon on the left to swap the work areas.
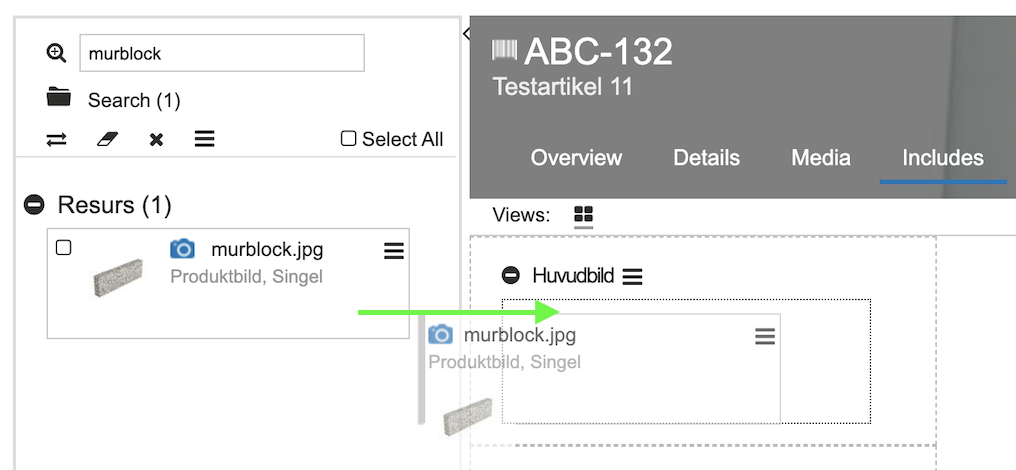
Then drag the image or document to the desired section to create the link.
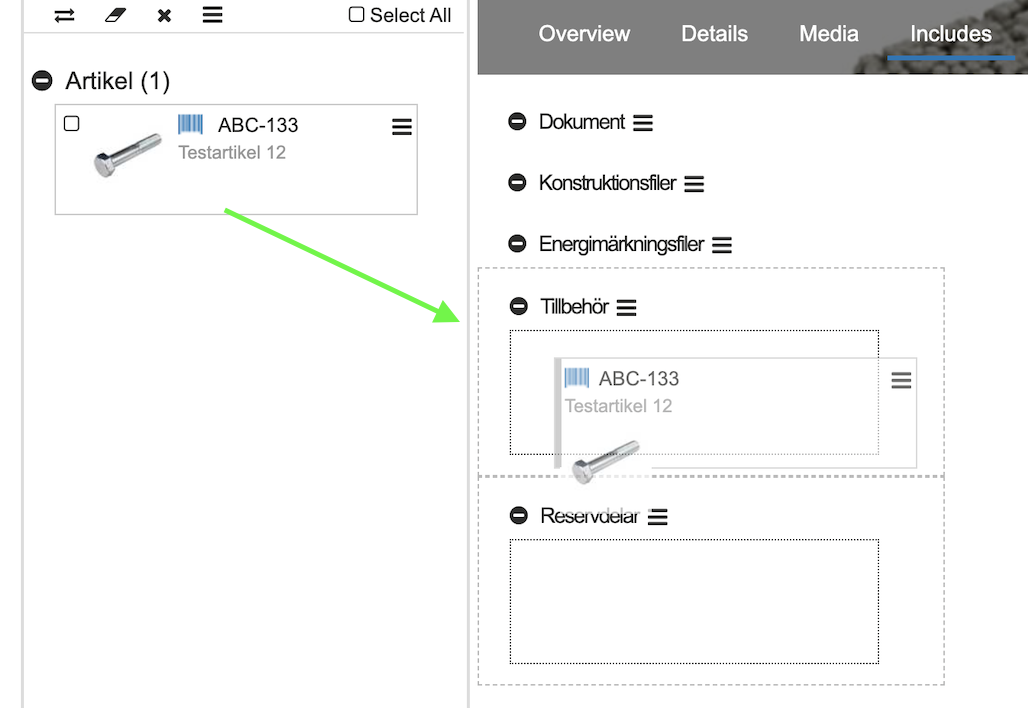
Link accessories and spare parts
Linking spare parts and accessories is done in the same way as linking resources, by dragging and dropping to the desired item. Search for the accessory or spare part you want to link to the item. Click Split to create two work areas.
Then search for and click on the item that should have the accessory or spare part. Open the Includes tab to enable linking. The accessory or spare part is now on the left and the item on the right. If the accessory or spare part is not visible, click the double-arrow icon on the left to swap the work areas.
Then drag the accessory or spare part to the desired section to create the link.
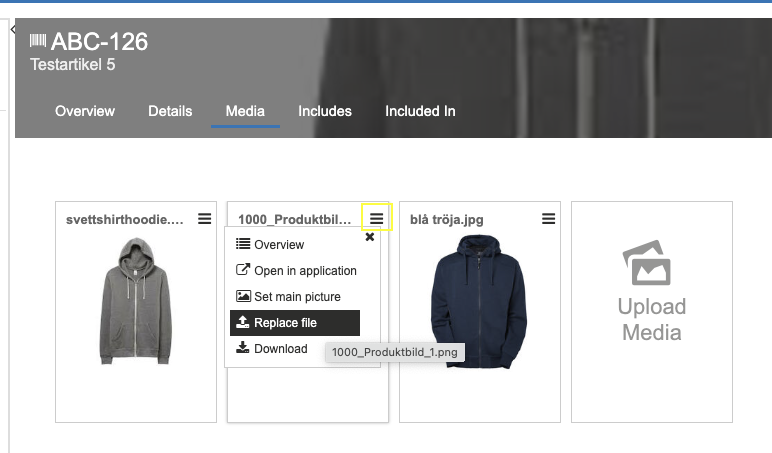
Replace resource
The easiest way to replace an existing resource with a new one is to open an item that has the old resource linked to it. Go to the Media tab. Click the three lines in the upper right corner of the selected resource. Choose Replace file and upload your new resource.
Note! The update applies to all items the resource is linked to.
Remove relations
At present, it is not possible to delete resources; you can only unlink them. If a resource is no longer linked to any item, it will be automatically deleted after 30 days.
There are three different ways to remove relationships and unlink resources from an item.
Unlink specific resources from an item
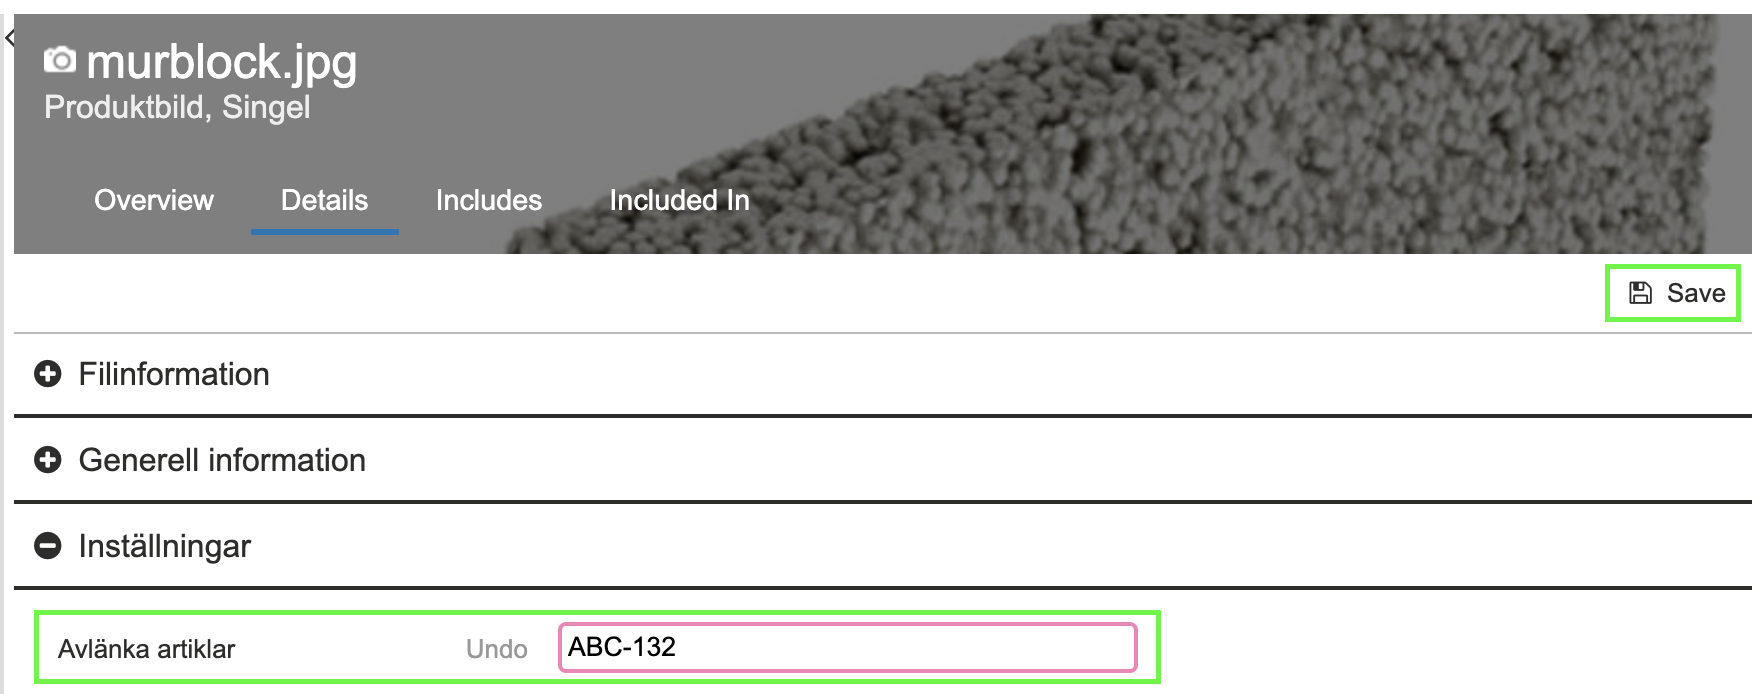
Search for your item and select the Details tab. Scroll down to the Settings subheading. Then enter the File ID of the resource to be unlinked. Save.
Tip! You can find the resource’s File ID under File information.
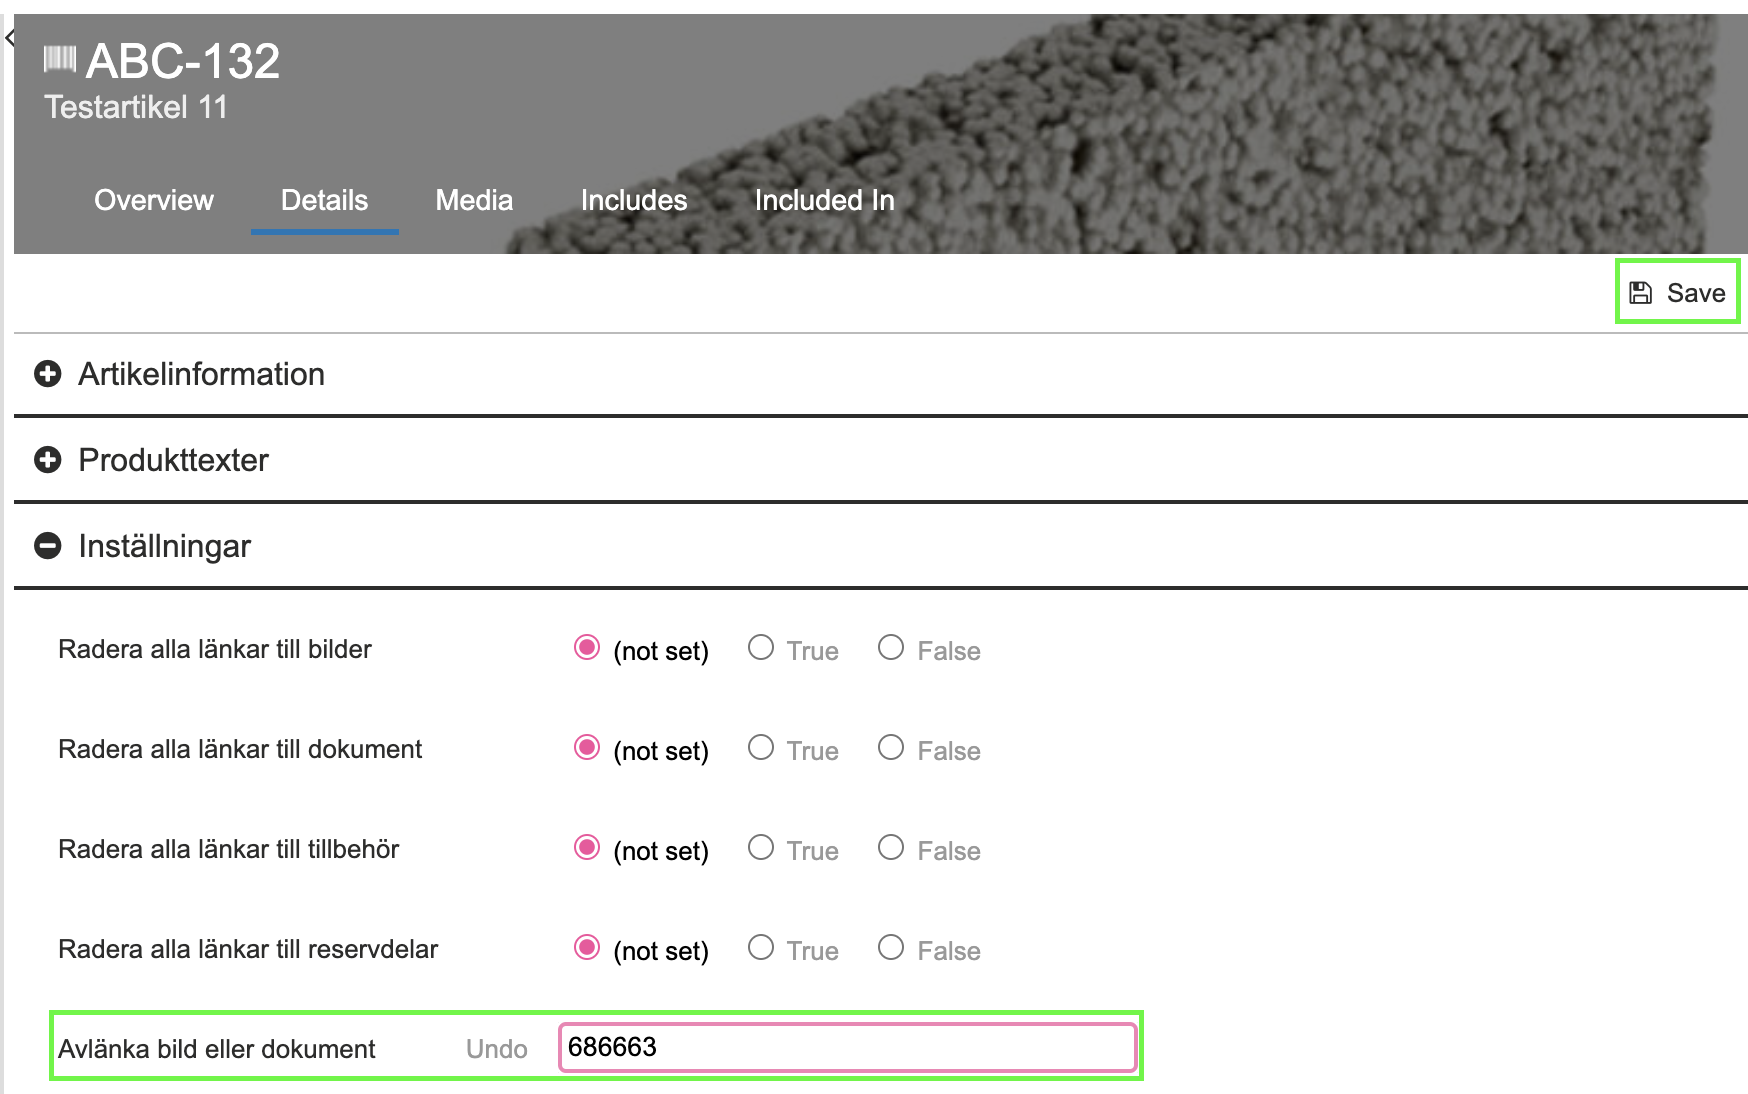
Unlink specific items from a resource
Search for your resource and select the Details tab. Scroll down to the Settings subheading. Enter the item number(s) of the item(s) to be unlinked from the resource. Save.
Unlink all resources of a specific resource type
Search for your item and select the Details tab. Scroll down to the Settings subheading. Set True for the resource type you want to unlink from the item. Save. Once the links have been cleared, the field will automatically be reset to not set.
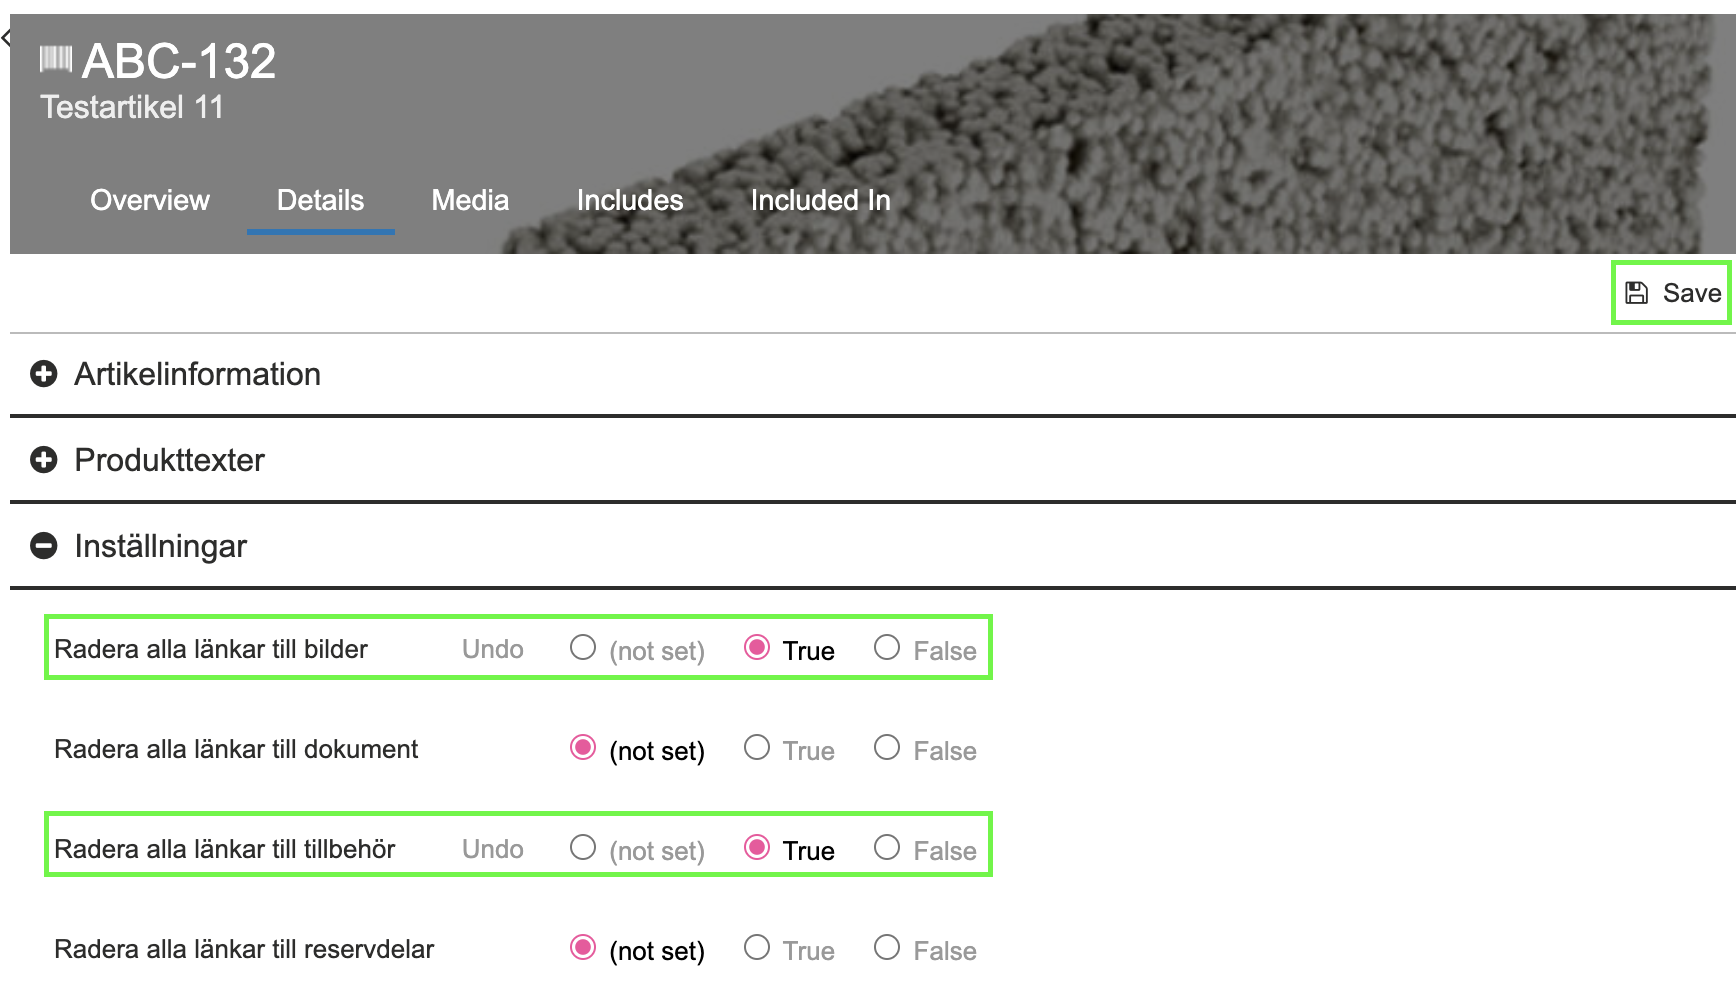
Note! This method will remove all links of a specific resource type.
Statistics and history
In the Finfo portal, under Statistics, you will find the statistics file where you can see the enrichment of resources and product texts for all items. The list is named: Username_MediaCentral_Statistics_SupplierSpecific.xlsx.
When an item is discontinued, it is set to status 90 after two years. It will then remain in Finfo Media for an additional six months.