
To perform bulk updates of article data, or if you prefer working via file import instead of the interface, go to the File Management tab and select Upload file.
Quick guide
-
Upload your article file.
-
Open the file with the status Not processed.
-
Select Import method and map your fields.
-
Start import.
-
Go to Article View, filter for Drafts, and select Publish.
Import an Article File in Finfo One
When importing article information via file in Finfo One, follow steps 1-4 below.

1. Upload file
Click Upload file and select the file you want to import, or drag the file directly into the upload area (drag and drop). Then click Upload.
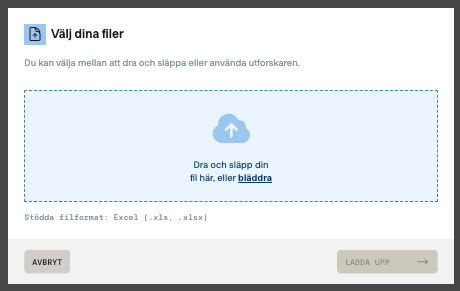
The file is now uploaded to the platform, but it has not yet been sent to Finfo.
The file status is now: NOT PROCESSED
Before the information can be read into the system, the file must first be processed.
2. Process file
Click the uploaded file with the status NOT PROCESSED.
In this step you must:
-
select Import type
-
select Import method
-
map your fields
Fields that are not mapped will not be imported into the system.
Import type
-
Currently, only Article information is available.
-
More import types, such as Media, will be added in the future.
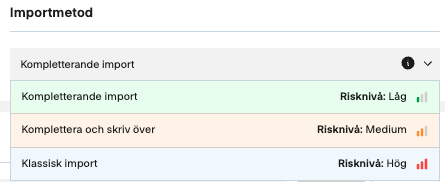
Import method
When importing data, you can choose between three different import methods depending on how existing information in the system should be affected. Each option handles new and existing data differently, so choose the method that best fits your needs.
-
Complementary
Only adds information to empty fields. Existing values remain unchanged. -
Complement and overwrite
Fills in empty fields and replaces existing information where the file contains data. -
Classic import
Overwrites all information according to the file content and mapping. This is the most extensive import and should be used with caution.
Field mapping
When the import type and import method have been selected, you need to map the file’s columns to the corresponding fields in Finfo One. This ensures that the correct information ends up in the correct place.
3. Start import
Once you have selected the import type and method and mapped all fields, you must confirm that you have reviewed the information and that everything is correct. Do this by checking the confirmation box at the bottom of the view.
Then click Start import.
The system will now read the information and apply the changes to the articles.
4. Publish drafts
When articles are modified in the system, DRAFTS are created.
To send the changes to the Finfo database, these drafts must be published.
-
Go to Article View
-
Select your
DRAFT -
Click Publish
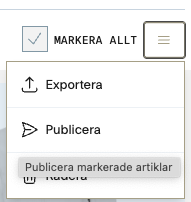
Note: Only drafts without error messages can be published. Please correct any errors before selecting Publish.
5. Changes sent to Finfo
Once the articles are published, the changes are sent to Finfo for manual review.
When the review is approved, the article status changes from MANUAL REVIEW to PUBLISHED. At the same time, the data is published and becomes available to all recipients.